bryanpjohnston

A blog by someone with not much to say.

Segoe UI Symbol Icons and WinRT Button Styling

For button styling in my WinRT app, I would run the Character Map utility, look up the Unicode value of an appropriate looking symbol in the Segoe UI Symbol font family, and specify that value as the content of my button.

<Button Content="& #xE109;" FontFamily="Segoe UI Symbol"/>

It seemed there had to be a better way to access standard icons. It seems that Microsoft provides the standard icons in a symbol enumeration.

So to use the standard icon for “add”, you can style your button like so:

<Button>
    <Button.Content>
        <SymbolIcon Symbol="Add"/>
    </Button.Content>
</Button>

Here are Microsoft’s Guidelines for Segoe UI Symbol icons.

TFS 2012 Build Fails When Unit Testing Multiple Platforms

For certain projects, I want to build both x86 and x64 platforms. I also would like to run unit tests for each platform. When you specify your unit tests, you must also specify the platform on which they should run.

tests

The problem is, by default, TFS tries to run each test set on each platform that you built. In my case, that means it tries to run the tests across platforms.

Project Configurations

Tests That Get Run

Release | x86

X86 (passes)

X64 (fails)

Release | x64

X86 (fails)

X64 (passes)

Actually, to be a bit more clear, the tests don’t fail. When an x86 test tries to run on the x64 platform build (and vice-versa), it generates the following build error:

None of the provided test containers match the Platform Architecture and .Net Framework settings for the test run. Platform: X86 .Net Framework: Framework45. Go to http://go.microsoft.com/?link for more details on managing these settings.
None of the provided test containers match the Platform Architecture and .Net Framework settings for the test run. Platform: X64 .Net Framework: Framework45. Go to http://go.microsoft.com/?link for more details on managing these settings.

To rectify the issue, you may modify the default xaml template that runs the build (or a custom template that you may have derived from the default TFS2012 template) so that TFS only attempts to run unit tests for the appropriate platform.

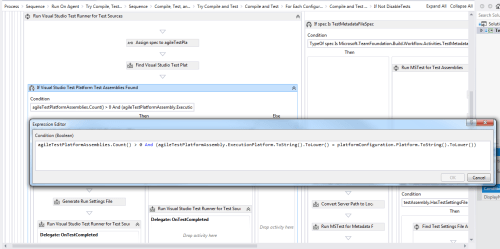
  1. In the xaml build template, navigate to the section on Run Visual Studio Test Runner for Test Sources
  2. Modify the condition of the section titled If Visual Studio Test Platform Test Assemblies Found to compare the platform of the unit test set to the platform of what was built (see screenshot):

    agileTestPlatformAssembly.ExecutionPlatform.ToString().ToLower() = platformConfiguration.Platform.ToString().ToLower()

cibuild

Now my x86 unit tests are only run on the x86 build and the x64 unit tests are only run on the x64 build. And more importantly, no build errors get generated.

Unit Tests Don’t Run After Installing Visual Studio 2012 Update 2

Shortly after our team installed VS2012 Update 2, I noticed our automated builds failed when executing unit tests.

TF900546: An unexpected error occurred while running the RunTests activity: ‘Method not found: ‘Void Microsoft.VisualStudio.TestPlatform.Utilities.ClientUtilities.InitializeTestPlatform(Microsoft.VisualStudio.TestPlatform.ObjectModel.Client.ITestPlatform, System.String, System.Collections.Generic.List`1<System.String>)’.’.

ciError

These problems didn’t occur when running tests locally. I updated the build machine with VS2012 Update 2 and still no luck. After failing to find any helpful information on the Internet, it hit me: the build machine doesn’t use VS2012 to run the builds. In fact, VS doesn’t need to be installed on the build machine at all (although it can be helpful when troubleshooting other issues).

I downloaded TFS 2012 Update 2 and installed it on the build machine. SUCCESS! No more failures when executing our unit tests on the build machine.


Automated Patch Building with WiX and Visual Studio

I’ve said previously that I generally prefer to implement major upgrades with each release and try not to worry about patching. I think it makes for a cleaner installation and is easier to manage. I mentioned in this post a way to update your installation by simply chaining an additional msi to your WiX bootstrapper. While that certainly is possible it feels a bit of a hack, and if you are fortunate enough to have authored your msi correctly from the beginning, you could use more traditional patch creation techniques. Until recently I haven’t had to create patches. While software companies are becoming more agile, there is a greater need to release software more often and deploy those updates online. I feel this creates a bigger need for patches. Furthermore, if you are developing a patch, you need an automated way of incorporating it into your build process so that it can be tested with each build.   After working through this process recently, I thought I would share a method of automatically generating a patch with each build of your installer project. Read the rest of this entry »

Windows Store Apps – Privacy Policy

If you are writing apps for Windows 8 and you want to earn money by placing ads in your app, it takes 3 easy steps:

  1. Create an account with the Microsoft Advertising pubCenter. Once you have an account, you can add applications and add units to your account.
  2. Use the Advertising SDK for Windows 8 to add the appropriate adcontrols to your app.
  3. Add a privacy policy to your app in order pass Windows 8 certification requirements.

The third step is not the most obvious and it seems this is a common reason for apps to fail Windows certification (including my own).

Item 4.1.1 of the Windows 8 app certification requirements states:

Your app must have a privacy statement if it is network-capable

Read the rest of this entry »

Custom WiX Managed Bootstrapper Application

I put together a sample project to show the minimum code needed to create your own managed bootstrapper application using WiX. I wrote it in C# using the MVVM pattern. This is indeed a bare bones example and if you are serious about writing your own managed bootstrapper application, you should download the WiX 3.6 source code and follow their example (see src\Setup\WixBA).

My solution contains three projects (can download the full source here).

  • TestBA:  The bootstrapper UX.
  • BootstrapperSetup:  The main bootstrapper executable that lists the packages to be installed.
  • DummyInstaller:  A dummy .msi that gets installed by the bootstrapper.

Read the rest of this entry »

Lazy Patching in WiX 3.6

With the upcoming release of WiX 3.6, I like to share about how I have used Burn to implement patching using a process I like to call lazy patching. Now I’ve never been a big fan of creating patches. I prefer to implement major upgrades and change the version number and product code with every build.  That said, I have a requirement to be able to install a patch and have only a few files get modified. Since I am versioning each dll with every build, I can’t use traditional patching techniques of comparing two .msis because each binary would get modified (even if by only a few bits).

Thanks to Burn, we can easily create a Bundle that includes all of our prereqs and packages to be included in a single product deployment. In my WiX Bootstrapper project, I include a RelatedBundle element and specify the UpgradeCode as its Id. So version 1.0.0.0 of MyProduct will have the following bits in Bundle.wxs:

Read the rest of this entry »

Hosting Licensed ActiveX Controls in WPF

Recently we had a need to host some ActiveX controls inside a WPF window. Hosting controls in a .NET Windows Forms app is pretty straight-forward, basically register the control, add it to your toolbox in Visual Studio, then drag-n-drop the control on your form. Hosting the control in a WPF window is possible by the use of a WindowsFormsHost. Here is a walkthrough for hosting an ActiveX control in WPF from MSDN.

However we found that some of our controls gave licensing errors which crashed the application. These were our own custom controls that contained licensed third party controls. Everything seemed to work when the controls were called from a VB executable, but when hosting them in WPF, the controls crashed if the developer license wasn’t installed on the computer.

Read the rest of this entry »